Archive for Listopad, 2013

22/11/2013

About layers.

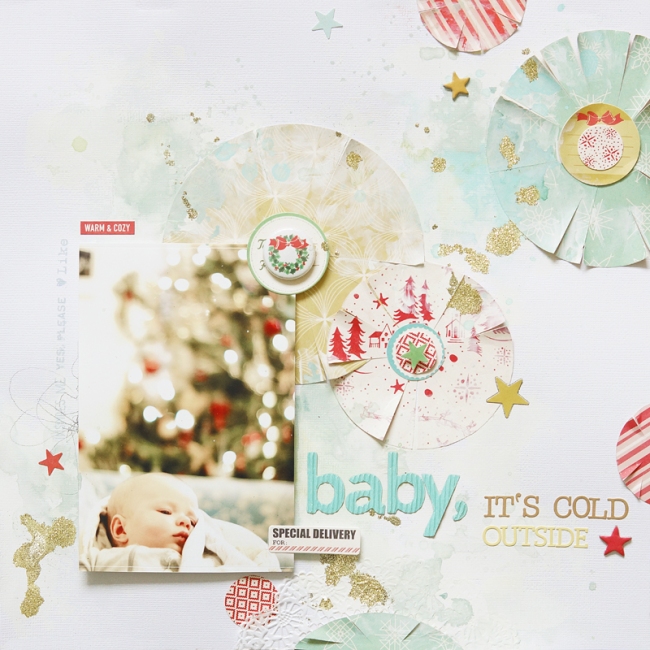
Hello! It’s Friday with October Afternoon ‚Silent Night’ line! I prepared next project using this collection and wrote a few words about the idea of layering. I have thought that I shall shared with you something that is a common feature of my works, still not so much complicated. I have decided to acquaint you with a “layering” technique, or creating the composition of a work on various, multiple layers. The layers in my works are structured on various planes – these are diverse, applied layer by layer media and paper elements.

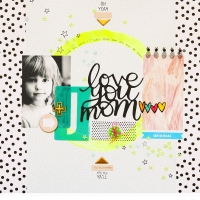
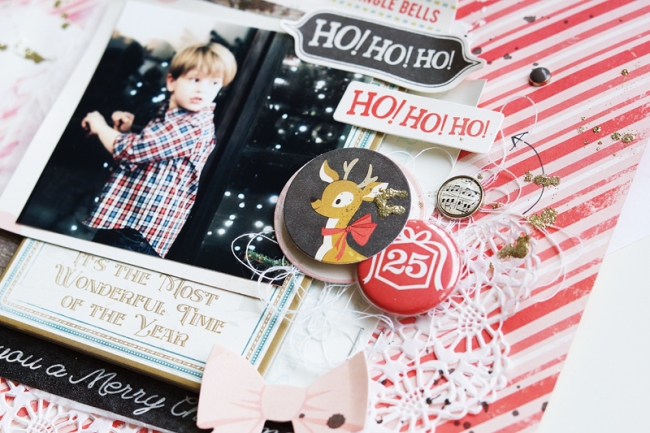
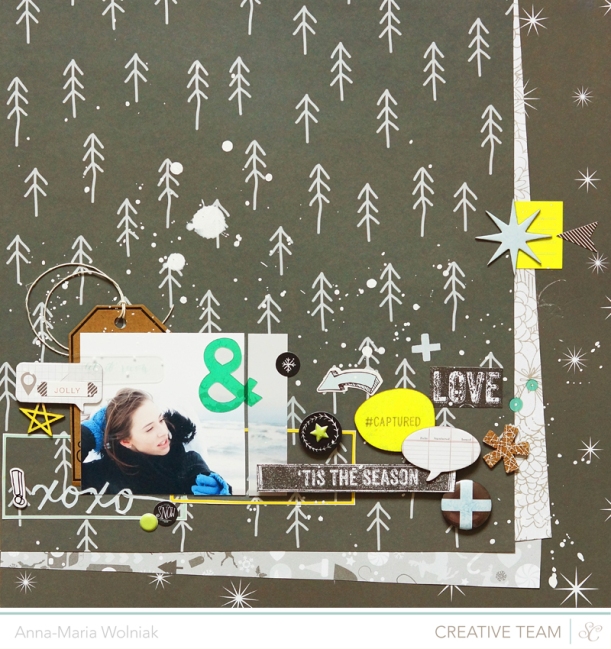
What materials can be used to create layers. The answer is -€“ anything you have at hand, any available paper scraps, pages from notebooks, clothing labels, tracing paper, tissue paper, fabric, tags, labels, stickers, paper bags, envelopes, threads, and any other possible „€œrubbish”. There are countless possibilities – you are limitied only by your imagination and the contents of your drawers. To create the layers of the work described below, I used: a fragment of a folded paper bag, a half of white paper doily, a piece of pattern papers, a chipboard, one stripe of washi tape, piece of cardboard, little label and some stickers. Usually I’m using more ‚not so scrappy’ things, but this time I get so many amazing ‚Silent Night’ goodies from October Afternoon so it would be a sin not to use them on my project.

Waiting for Santa

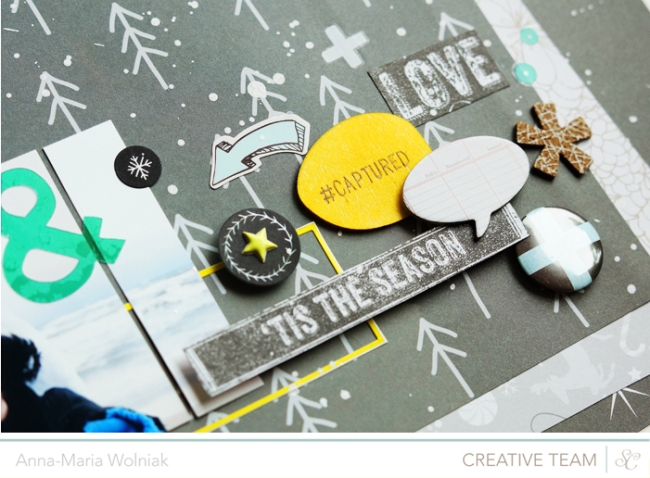
How to create layers and what is essential to make them. Layering means applying subsequent elements of composition onto one another. I prefer working „€œfrom detail to whole”. I strat with a picture. Then, using some glue or double-sided adhesive tape, I attach subsequent layers of paper under the photo. Sometimes I try to align the elements along the edge of the picture, other times I concentrate on creating a really big mess. Remeber that not all the layers must closely adhere to each other. It is sufficient if they are attached to each other in two or three places. Thanks to this, the whole work will seem more dimensional. It is also cool to stick some little 3D sponges underneath the final layers. Then, the effect of dimension is even more visible, which makes the work even more interesting. As soon as all the layers are arranged and glued, I attach them to the base. Later, I add some elements such as a title, journaling, stamps – you are always bound to find some free space that asks for a sticker or a stamp. You should follow these suggestions with no objections.

DSC00070

Why layering produces such amazing effects. I do not really know how to answer this question myself. When I look at such dimensional works, I have an impression that thanks to subsequent layers the whole structure is much more interesting. Something is hidden behind something else, some other thing is being pushed to the foreground as if it wanted to say: „€œI am more attractive”, €”My colour is nicer”, „€œPay attention to me first!”. You might think that I am a bit round the bend, but these are the impressions I really get while admiring this sort of works. They talk to me, they appeal to me. Their speech leads me through the whole work, starting with the dominant elements (which is usually the photo – the main element of the composition), until the tiniest, the least noticeable details, such as miniature stamps or almost invisible, pastel colour spots. Dimensionality is an instrument that allows me to enter the word of travelling through subsequent layers, and I really think it is wonderful. And the most important thing about it is that it is so incredibly easy, which is something I hope I have proven to you in this text. You do not need much to have your layout look attractive – you do not need en excess of materials, you might even use scraps and fragments of previously cut papers. It is also a perfect way to create hiding-places for your souvenirs, or private notes.

21/11/2013

Magical…

It’s almost December so officially it’s time to put the ‚Magical‚ line at your scrap desk! If you haven’t made that yet – here are some reasons why you should do that as soon as possible!

First of all – Studio Calico prepared amazing patterns and shades of colours for the upcoming winter time. I decided to move away from the traditional palette and I used more monochromatic shades of grey, black and white. Of course I wouldn’t be myself  if I hadn’t added a little touch of colour as well. These are my propostions what you can create with ‚Magical‚ collection.

tis the season xoxo

Neon yellow and emerald, vibrant green – yes please!

tis the 1

And the second project – this tiem with a touch of gold and tiny splashes of emeralnd green (I’m obsessed with this colour lately!).

snowy holidays

Oh! And don’t forget about the great offert! You can grab the first Studio Calico ‚Jubilee’ e-book with amazing kit included and free shipping! Order it right now! You still have chance to get it!
6a00d83451b44f69e2019b00d50bc3970b-800wi

15/11/2013

What you can do with Sprinklers…

This is my third Friday meeting with October Afternoon readers. This time I decided to show my dear readers one of the possibilities how to use October Afternoon Sprinklers!

This is one of my favourites technique to use them at the same way as custom watercolours. Here you have a short tutorial with step by step photos how to work with colours to get the watercolour effect on your project.

DSC00085

First I combine a simple composition based on two, bright pattern papers with some green elements. I added the main motive of this project – christmas trees (the motive suits to the theme of the photo I chose for this layout). I applied some gesso here and there all over the composition using an old credit card, and I left it until it completely dried up (this is very important information; gesso have to be completely dry till you start working with Sprinklers or other media).

DSC00086

Now take a brush and put a huge drop of water on the gesso surface. Till it will be dry, open the Sprinkler bottle and apply the paint using the Sprinkler’s applicator or smooth brush. Put the drop of colour into the drop of water…

DSC00090

… work at the same way with other colours of your Sprinklers. Try to mix them a little bit. Don’t use a lot of colours, for the begining I recommend you to use different shades of one colour or mix just of two colours like I did here.

DSC00092

Apply more and more colour untill the effect will be good enough in your opinion. When your painting will be dry you can add some opaque white splashes then you will get and effect of snowy weather 🙂

Here is my ready project made with October Afternoon ‚Silent Night’ collection and my favourite Sprinklers:

OA Christmas Tree

DSC00098

DSC00102
Now I am probably landing in Budapest becasue tomorrow I will have great pleasure to meet my Hungarian friends! Can’t wait to create with you this year December Daily album with October Afternoon supplies and Studio Calico Letterpress prints! See you there!!!

09/11/2013

Jubilee e-book!!!

6a00d83451b44f69e2019b00d53c91970d-800wi

We are so excited because of  very first Studio Calico e-book!!! The Jubilee e-book is consists of 100 projects and designs made by your favourite Studio Calico Creative Team members!!!

23103721259e62b059818340_688x299

If you are interested in sneak peek at the book you have a chance! Just click HERE and you will be upload first five pages for free!

Sample-download-graphic-mockWe were working with an amazing ‚Jubilee’ kit to create our inspirational projects. Now you can also have it! You can grab these remarkable beauties in the e-book prize!

large

The Jubilee e-book will be available for download from your „My Digital Files” page on 11/17/2013.


Kit Contents


All presale kits will ship for free, no matter where you live! Kits will begin shipping on 11/20/2013.


  • 11 8x8in double sided papers – Studio Calico, Tim & Beck, Basic Grey, Paislee Press, Echo Park and LifeLovePaper
  • 4 4x6in Double Sided Journaling Cards – Studio Calico & Paislee Press
  • Exclusive Jubilee mini mist – Studio Calico
  • 4x6in stamp set – LifeLovePaper
  • Veneer Circles & Asterisks – LiveLovePaper
  • Cork Stars – Studio Calico
  • Black Alphabet Stickers – Basic Grey
  • Frosted Acrylic Cameras & Stars – Studio Calico
  • „Epic” & „Neato” badges – Hello Forever
  • Sequin Pack – Studio Selections


As part of your purchase, you’ll also receive access to exclusive digital files (shown above) – printables from Hello Forever, cut files from In A Creative Bubble and Shanna Noel, and a digital version of the kit stamps.

6a00d83451b44f69e2019b00d50bc3970b-800wi

I had an honour to be one of the contributors, so you will find two of my projects inside this e-book! In my opinion this is something what you should have on your computers, tablets or smart phones! These are some of the close-ups on my layouts…

SONY DSC

SONY DSC

08/11/2013

Glitter splashes tutorial

Welcome my dear readers! We meet once again with October Afternoon supplies! This is the second Friday when I am a guest designer of this brand. I prepared something special for today’s post. A short and easy ‚glitter splatters’ tutorial which is perfect for all your chrismtassy projects!

Logo_SilentNight

Let’s start. We will need just a few things to do these fabulous splatters. Glue (I use a Ranger glue, but it can be every liquide paper glue you usually use), water, brush and glitter.

SONY DSC

 Put a tiny drop of glue on something (I used a nut from a little jar), and water and mixed it in 1:2 proportion (two parts of water).

SONY DSC
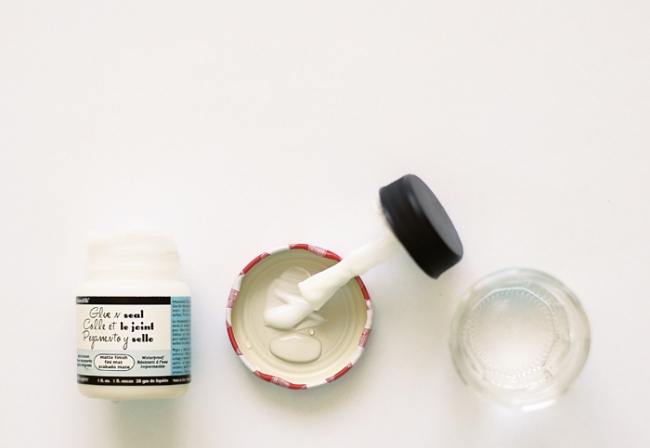
Now just make some water-glue splatter on your surface and don’t let them dry until…SONY DSC… you sprinkle them by the glitter.

SONY DSC

Let the glue with glitter dry and then just blow the excess of glitter. The splattters are ready. It’s very easy, isn’t it? And how attractive! I really love these splatters, I used some in one of my last week projects (‚Baby it’s cold outside‚).

Rudolf

Here you have an example, my ‚very merry’ reindeer! Of course the whole project is made with latest October Afternoon line – ‚Silent Night’!

DSC00079

 This time I didn’t make any chaotic splashes. I painted (using a water-glue mixture) this chevron pattern and then I sprinkled it with glitter. The whole process is the same as above, only a shape of it is different.

DSC00083
I hope my ‚glitter splashes’ tutorial was helpful. I would like to see your project with this techinique as well! Have a nice weekend. Soon we will seen with brand new Studio Calico December senak peeks!!!

08/11/2013

Lory & Anna-Maria a Roma!

Finally! Finally my friends, I will visit Italy to teach my watercolour technique!!! It’s gonna be an amazing event where Lory and me will share  our scrapbooking and mixed-media knowledge with you!

AM Lory Roma

The event will take place at February 23th (Sunday) in Rome! The participants will be able to take part in two different classes. The topics  are: mini-album, two layouts, letterpress, watercolours and other media, layering, etc… We will be working with amazing kits in great atmosphere!!! The number places is limited so don’t wait to long with your decision! If you already decided that you want to take part in this fabulous scrapbooking event just write on one of these e-mails and book your place!

+   +   +

Irene :: irene.calicchia@libero.it

Lory :: lory_bucaria@libero.it

+   +   +

I will give you more details soon! I am so happy that I will have a possibility to meet with Italian girls! I’m sure it will be great adventure for us!

04/11/2013

Diario de Navidad in Madrid!!!

Aaaaaaaaaaaaaaaaaaaaaaaaayayayayayayyayayayayay!!!! Siiiiiiiiiiiiii! Vuelvo a Madrid!!!

El día 14 de diciembre. Un súper taller de Navidad con un Diario precioso para poner todos las anécdotas de estas fiestas de 2013.

Bambola diario de navidad kopia kopia

Además el kit es fantástico de October Afternoon. Precioso!!!! Trabajaremos con la Letterpress de Studio Calico y las nuevas placas navideñas, acuarelas, sprays, papeles y decoraciones preciosas…

Durante unas cuantas horas en clase realizaremos un mini álbum para que guardes los recuerdos más entrañables de 2013! Trabajaremos con la magnífica colección “Make it Merry” de la marca October Afternoon! También haremos impresiones con letterpress! He preparado para vosotras las placas de la nueva colección de navidad “Chrismassy” de Kal Barteski. Cada kits contendrá unos cuantos papeles, pegatinas de alfabeto, alfabeto pequeño adhesivo, etiquetas adhesivas, adornos troquelados, postales vintage y otras cositas bonitas. También habrá algunos elementos mix media así que no olvidéis traer vuestras acuarelas, sprays y mists (Por supuesto que habrá en la clase para compartir, yo traeré)


¿Qué necesitas? Tu tinta negra (u otro color si quieres) para estampar, gesso (pondremos para compartir), acuarelas y otros materiales como los sprinklers de October Afternoon, los sprays de Mister Huey´s, lápices acuarelables… lo que tengas en tu casa que quieras aprovechar. Aunque tendremos para compartir la mayoría de nosotras preferimos usar nuestras cosas.


 No te olvides del pegamento, tijeras y pinceles suaves. Si tienes washi tapes de navidad… ¡Tráelas también! Yo traeré de las mías para compartir así como mis sellos de Navidad, trae tus favoritos. Compartiré con vosotras lo que tenga de diciembre… : ) Si tienes foam dimensional porque te gusta el efecto 2D tráelo también.


Como la clase es a mitad de diciembre puedes preparar fotos de diciembre o de todo el año. ¡¡¡NO TE OLVIDES DE LAS FOTOS!!! Trata de sacar una o dos fotos por día desde que comienza diciembre para hacer el enfoque: “Esperando la Navidad”  Si tenéis las fotos preparadas el trabajo será mucho más interesante y podremos hacer la mejor composición. También puedes preparar fotos del año pasado y cerrarlo con esos recuerdos en este álbum.
+   +   +
Fecha limite de inscripción 30 de Noviembre
Apúntate aquí info@bambolacasacreativa.es o al telefono 913143062
+   +   +
Además, entre todas las personas que compartais en vuestras Redes Sociales y pongáis un comentario en este post, sortearemos este curso. ¡Lo has oído bien! Así que comparte  y hasta el día 1 de diciembre podréis compartir y participar y quien sabe… lo mismo ganas y vienes gratis al curso 🙂
Estoy deseando veros en Madrid otra vez. ¡Os veo en Diciembre!
01/11/2013

October Afternoon guest designer!!!

Hiiiiiiii!!! My dreams come true every time I open a happy e-mail! This time it was something totally amazing. I feel honoured to inform you, that I will be a guest designer at October Afternoon blog during whole November!!! With my work I will try to introduce you to the newest christmas line – ‚Silent Night’. I received a huuuuge box full of these goodies (oh, happy me!). At every Friday I will be preparing some tutorials and articles about various techniques which you can use in your christmassy projects.

Logo_SilentNight

For today I prepared two, quite simmilar layouts. Their compositions are totally different but they were built on the same colour palette. These colours are coming from all ‚Silent Night’ supplies. I am in love with these cyans, reds and beiges with a touch of green.

Baby it is cold outside(these letters are coming from different Studio Calico kits and they are not a part of ‚Silent Night’ line)
 
Baby it is 1 (2)
 
Baby it is 1 (3)
 

You can find here everything what I will try to teach you in my next posts: how to work with October Afternoon Sprinklers, now to create glitter splashes, now to combine the layers… so please treat this post as an introduction to our future meetings on OA blog.

Fun find

This layout is the example of how to use these lovely paper sew banners in the easiest way.  To be true I had no idea what to do with them and this kind of ornament seemed to be the best solution. I grabbed sew banners, stickers, labels, brads and chipboards in one place, added one of my favourites photos made three years ago, and combined a few simple layers.

Fun find  (1)

Fun find  (2)

+   +   +

Talking about Christmas… I have to  remind you that October Afternoon is the main sponsore of my December Daily 2o13 classes in Budapest!!!

DD in Budapest

This is your last chance to sign up for the classes!!! If you are interested and still didn’t book your place there just click HERE!!!
you have only four days till the end of registration.

+   +   +

Wish you amazing weekend and hope to see with you next Friday. Hugs!!!